Growing 101 — From Seed to Harvest
A complete beginner's walkthrough for your first grow — gear, setup, and every stage from germination to cure.
So you want to start growing, but have no idea where to start? This guide takes you through the whole journey: the gear you need, setting up your space, and every stage from a single seed to a jar of finished, cured flower.
Read it fully before you buy anything — a few decisions early on save a lot of headaches later. Local laws vary; only grow where it’s legal for you to do so.
Items you will need
- Seeds — buy from a reputable seedbank. Decide between autoflower (simpler, faster, finishes on its own timer) and photoperiod (you control veg/flower with the light schedule, bigger yields). Beginners often start with autos.
- Growing medium — quality soil (a “living” or pre-amended potting mix is forgiving), or coco coir/perlite for a more hands-on hydro-style grow. Avoid anything advertising “extended” or “slow-release” nutrients.
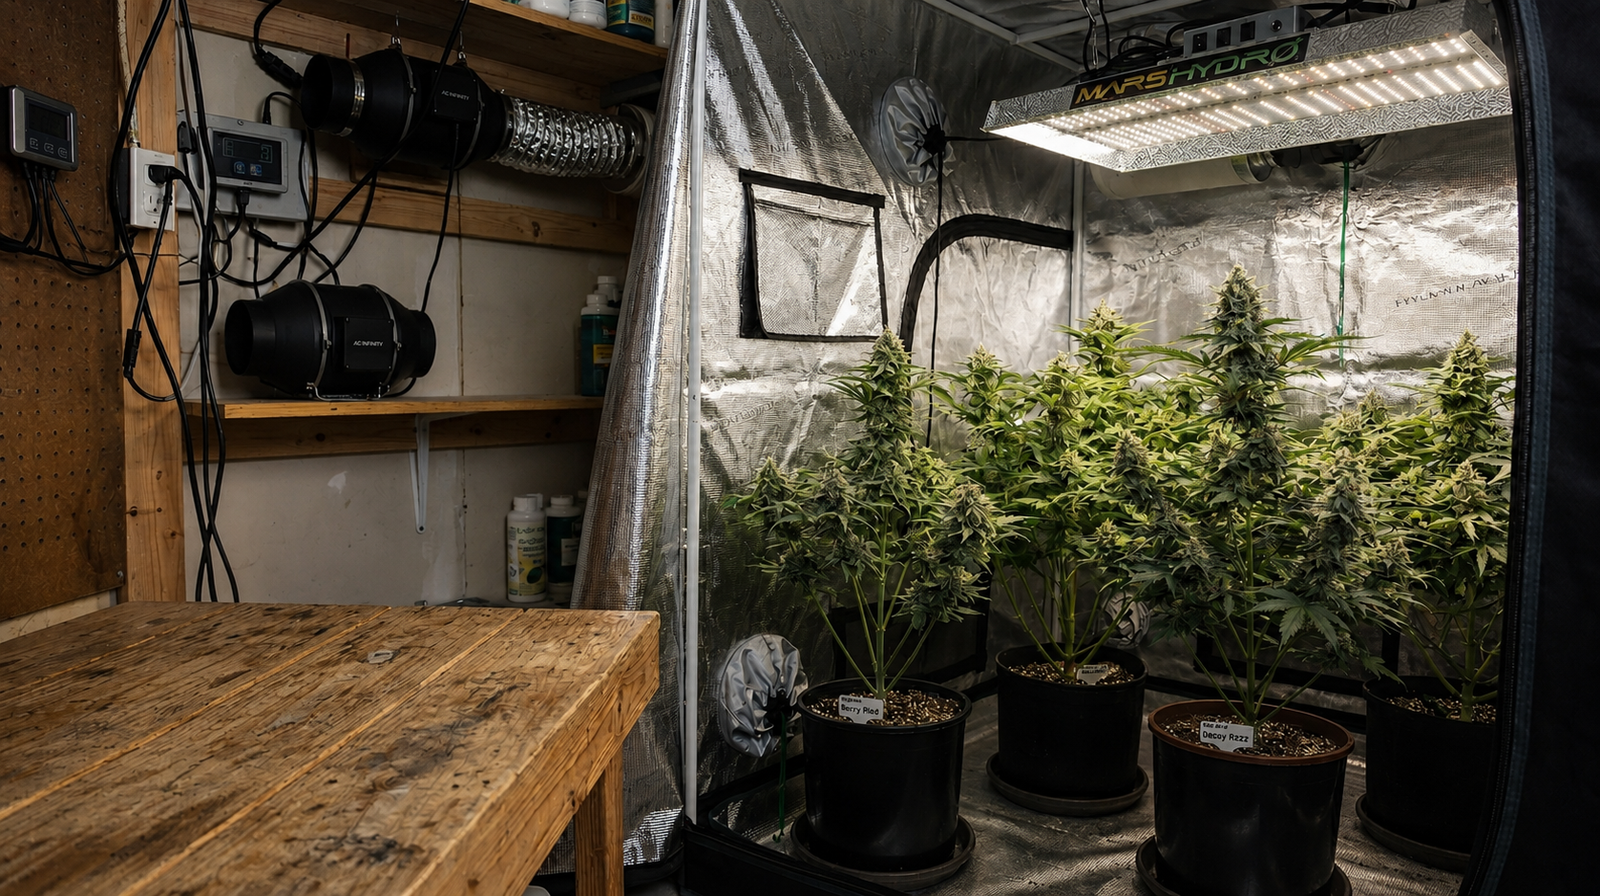
- A light + a timer — see the lighting section below. The timer is not optional; consistency matters.
- Ventilation — at minimum an oscillating fan for airflow; ideally an exhaust fan + carbon filter for heat, humidity, and smell.
- Nutrients — a basic grow/bloom nutrient line. Don’t overthink the brand; do follow a feeding schedule.
- Pots with drainage — anything with holes in the bottom. Fabric pots and 5-gallon buckets (drilled) are popular.
- A pH meter and/or PPM/TDS meter — for testing your water and feed. This is the tool beginners skip and then regret.
- A jeweler’s loupe or pocket microscope — to read trichomes at harvest.
Your grow area
Decide where the grow lives: a closet, a tent, a spare corner, a custom box. The ideal space is well-ventilated, light-tight (no leaks — important for both stealth and for flowering), and tall and wide enough to fit the plant plus the light and fans above it.
Clean the space thoroughly. Walls should be white or lined with reflective material. Mount your light and fans securely — if something falls mid-grow it can wreck the plant.
Keep your light as close as the plant can tolerate. A quick test: hold your hand at canopy height for 30 seconds. If it’s not uncomfortably hot for your hand, it won’t cook the plant.
How much light?
Light is the engine of your grow. Rough targets per square foot of canopy:
- LED panels/bars (modern, non-“blurple”) — ~30–40 real watts/ft². The beginner default: efficient and cool-running.
- HID (HPS/MH/CMH) — ~50–80 watts/ft². Proven and cheap to buy, but hot and harder to manage in a small space.
- CFL — at least ~80 real watts/ft². Fine for a tiny grow or seedlings.
- T5 fluorescent — ~80–100+ watts/ft². Great for seedlings and clones, workable for a small veg.
- Incandescent / random household bulbs — don’t. They won’t work.
Planting your first seeds
This is where a lot of beginners stumble, so go slow. Common germination methods: between damp paper towels in a dark spot, in a glass of water until the taproot shows, in a soaked rockwool cube, or straight into moist soil.
To go straight into soil: wet the medium first, poke a hole about half a knuckle deep, drop in one seed, and cover it lightly — don’t pack it down. Keep it warm and under gentle light. It can take a few days to over a week to break the surface. Be patient; not every seed pops.
Once it sprouts, water gently and only as needed.
Vegetation stage
As the plant grows it outgrows its starter container. Transplant it into a larger pot before it gets root-bound: prepare the new pot, gently squeeze the old container to loosen the rootball, and slide the plant out without exposing the roots to light for long. Water it in and let it settle — it may pause growth for a day, which is normal.
During veg, photoperiod plants need a long light period — 18 hours on / 6 off (some run 24/0). If they get too long a dark period, they may start flowering early. Autoflowers can stay on 18/6 their entire life and will flower on their own schedule.
Watering, nutrients, and pH
Watering is the #1 thing beginners get wrong. Overwatering isn’t “too much water at once” — it’s watering too often. Two simple steps:
- Wait until the soil is dry a knuckle or so deep (stick your finger in and feel). Lifting the pot to judge it by weight works too.
- Then water until a little drains out the bottom. Go back to step 1.
Nutrients: follow your nutrient line’s schedule, but ramp up slowly — start at ¼ or ½ strength and work up. Don’t feed every watering; many growers alternate, or run plain water between feeds.
pH controls whether the plant can even absorb those nutrients. Test your water before nutrients, your mix after, and your runoff:
- Soil: aim for a pH of roughly 6.3–6.8.
- Hydro/coco: aim for roughly 5.5–6.1.
Use pH Up / pH Down to bring it into range. If leaves look “off,” the fix is almost never more nutrients — check pH first.
Training (optional, high payoff)
Training shapes the plant for more even light and bigger yields. Do it in veg, not flower — “abuse them in veg, treat them like princesses in flower”:
- LST (Low Stress Training) — gently tie branches down to open up the canopy.
- SCROG (Screen of Green) — weave growth through a net for a flat, even canopy.
- Topping / FIMming — cut the top to split one main stem into multiple colas.
- Super cropping — carefully pinch/bend stems to strengthen them.
Most plants roughly double (sometimes triple) in height in early flower, so flip to flower when they’re about half your remaining vertical space.
Cloning (optional)
Cloning is a faster, free alternative to germinating new seeds each cycle: you cut a growing tip off a healthy plant, root it, and grow a genetic copy. Take clones a couple of weeks before flipping the mother to flower, so she has time to heal and regrow. It’s a great way to keep a strain you like going without buying seeds again — and clones skip the unpredictable germination stage.
Flowering stage
To trigger flowering in photoperiod plants, switch the light to a strict 12 on / 12 off — and keep the dark period truly dark. Light leaks during flower cause real problems. Switch to bloom nutrients, again ramping up slowly.
A week or two in, you can sex the plants: females show white hairs (pistils); males show small round pollen sacs. Unless you want seeds, remove males before the sacs open — pollen will seed your females and reduce potency.
As flowering finishes, watch the trichomes (those tiny resin glands) with your loupe. Clear = too early; cloudy/milky = peak; amber = more sedative. Harvest window depends on the effect you want, and varies by strain — often ~6–10+ weeks of flower. Patience pays.
Harvesting, drying, and curing
When the trichomes look right, chop the plant. Then:
- Dry slowly — hang in a dark, ~60°F / ~60% RH space with gentle airflow for about 7–14 days, until small stems snap rather than bend.
- Cure — trim and place buds in airtight jars at ~60–62% RH. “Burp” the jars (open them briefly) daily for the first week or two, then less often. A proper cure over a few weeks is the difference between harsh and smooth.
Closing remarks
Growing is a rewarding hobby, but it rewards patience and consistency over gadgets. Get the boring stuff right — light, water, pH, airflow — and the plant does the rest.
Got specific problems? Head to the Growing FAQ.